Essence

glowing tapa in semi-darkness

The Visible and the Invisible

Experiments with photo-luminescent pigments on tapa and fabric

The New Zealand company GloTech, Inc. has agreed to a part sponsorship of my Spirit Sail project with their rare earth photo-luminescent pigments. I asked for a small amount to experiment with. CCG Industries in New Zealand has in principle agreed to sponsor the binder for the final project but were unable to send over a small sample amount of heat-set medium for fabric painting. Instead, Elena Tavioni of TAV Ltd. in Rarotonga was so generous as to come to the rescue.

Letter from Singapore
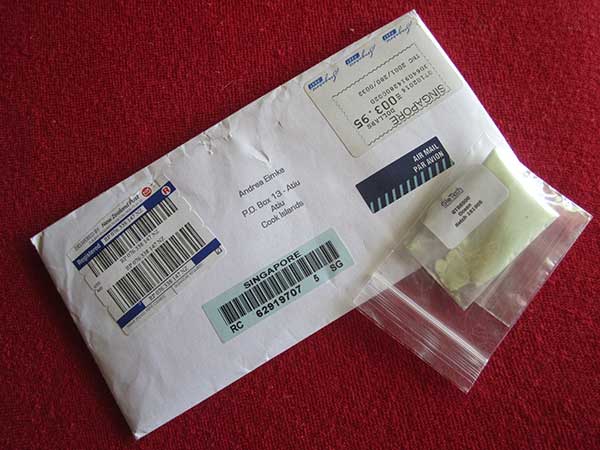
It took some time for the 20 g photo-luminescent pigment sample to arrive. The company had it sent over directly from Singapore. Elena let me have half a bucket (way too much) of the heat-set medium to mix the with the pigments to make a luminescent fabric paint.

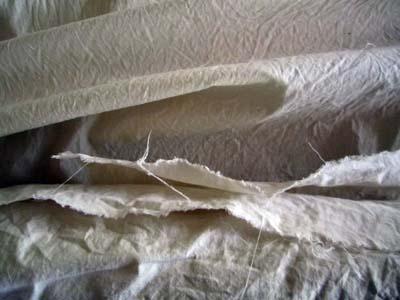
I mixed the pigments in the ratio directed by the manufacturer. I first painted the thin part of a piece of white, lacy paper mulberry bark cloth and also the other end where the fibres are coarser and more densely spaced. That way I could appreciate the difference. My cotton mull dropcloth now has traces of the paint mix from seeping through the tapa.

photoluminescence on transparent tapa This photo was taken in plain daylight shining UV light on the tapa with a torch.

white tapa with invisible paintIn normal daylight, the paint is hardly visible on the white tapa. I placed my samples outside in the sun to dry and charge with natural UV light.

painted white fabric in daylight
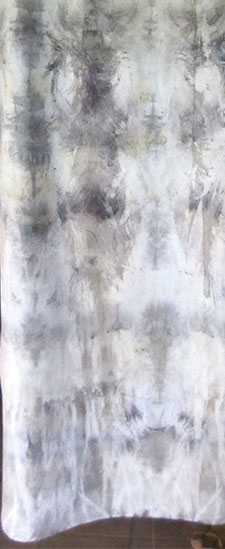
I also painted a small strip of white cotton fabric. The paint dries really fast. When the small amount was nearly used up, I thinned it with water twice so as not to waste anything and to see how the performance would change. It is difficult to discern the paint in daylight, but on the fabric it was visible having a slight greenish tint.

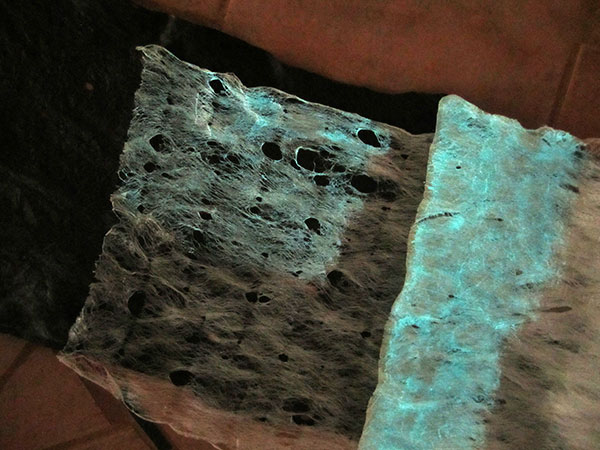
After about two hours the sun had wandered around the house and I decided to take my samples inside and check for an effect. I was richly rewarded by a beautiful glow (see featured image at top). The photo was taken in semi darkness. I placed the painted tapa on a piece of black tapa for contrast.

glowing tapa and fabric in darknessEntering a dark room with the fabrics was an amazing experience. The glow was very strong and even helped me find my way around the room in the darkness. I hung the three samples up side by side for photographing. I had to manipulate the photos on the computer to make the glow better visible. What we see in this photo is pretty close to what I saw.

varying glow intensityI have learned from this experiment that it is OK to thin the medium which is water-based, because the pigment powder thickens it. In the varying intensity of the glow on the fabric strip we can clearly appreciate the thinning of the paint. The thinnest mixture is in the lines on the right. There was nearly no paint left but obviously still enough pigments to have some effect. I will experiment with a different ratio, using more medium and less pigment so that the paint can cover a larger area.

Glowing tapa in darknessThe difference in intensity in this photograph is not just caused by the difference in consistency of the tapa or the paint, but also because the left side of the photo shows the wrong side of the thin lacy part of the tapa. It was interesting to note that the luminescence can be observed on both sides of the transparent tapa.

The glow effect had disappeared after two hours, about the same time that the samples had been exposed to UV light. When exposed to daylight for about a whole day, the glow effect did not continue for so much longer. I look forward to living with a piece in with I incorporate photo-luminescent fabric. The painted fabrics will develop a different life at night.

The visual effect of these pigments makes me think of the mind. During the day it gets ‘charged’ with all sorts of experiences, the impressions of which are re-lived, in part, and worked through during the un-consciousness of sleep. The day-time picture dazzles us with a variety of sense perceptions and experiences. The night-time picture of the unconscious only leaves their essence. I have only just begun to think more about the expressive possibilities this photo-luminescent paint offers me. It will be fun to experiment some more…

Spirit Sail – Design (1)

two sails

The Sail

A sail can be defined as a large piece of strong cloth that can catch the wind to move a vessel or vehicle forward.[1] Sails, affixed to single hull and double hull voyaging canoes, were instrumental in the discovery and population of the Pacific islands. Their form reflected in infinite variety the imagination and experimentations of the different peoples who explored the vast extensions of the Pacific ocean and populated their countless islands.[2]

Pacific islands sail shapeMost of their sails were triangular, attached to v-shaped spars. They were made of vegetable material such as pandanus which was plaited in strips and might have been sewn together with cord twined from bark fibres such as oronga (Touchardia latifolia) or au (Hibiscus tiliaceus).

Even though the wooden and later iron sailing ships of seafaring European explorers differed hugely from the well-balanced Pacific islands catamarans, their square or triangular cloth sails were also shaped to accommodate the play of wind and water forces. Like the Edna, they had many differently shaped sails.

Edna all rigged upSailcloth, also called ‘duck’, derived from the Dutch word for cloth = doek, was woven from strong flax or hemp, and in the 19th century, cotton fibres[3]. Today, most sails are made of synthetic materials[4].

Spirit

Spirit – from Latin spiritus = soul, courage, vigor, breath[5] – can be considered the non-material, the essence, the animating force that brings a body to life, the energy that propels us forward (French: l’esprit), the in-spiration that gives a project momentum, the a-spiration that causes us to reach a goal. Spirit is synonymous with psyche, soul, and in some languages such as my own (spirit in German = Geist) with mind. Spirit is “the self-supporting absolutely real ultimate being (Wesen = essence).”[6]

What would a Spirit Sail have to look like?

In my “quest for the perfect shape” of this ‘spirit sail’ I learn that “[t]here is no such thing as the best sail shape – there are countless different “best” shapes, depending on the wind, waves, boat type & size, even weather & air temperature.”[7] Duh, no help here! I guess, it will be entirely up to my imagination.

So: what do I want it to look like?

  • it should have a preferably universal sail shape to be recognizable as a sail
  • it should be transparent to refer to the spirit’s invisibility
  • it should be delicate without being frail to hint at spiritual acuity
  • it should be visible in daylight and at night-time to symbolise the infinity of spirit
  • it should be textile – textile signifying for me both text and touch
  • it should be large enough to be seen from afar and small enough to be made in my studio

I will use the materials that I have brought and will still bring in touch with the Edna’s remains. I ordered Polymer ribbon that glows in the dark after having been exposed to UV light. I am awaiting textile heat-set paint medium to experiment with rare earth pigments that have the same effect.

From photographs I could gather that both the Edna and our Cook Islands Vaka (double-hull voyaging canoe) “Marumaru Atua” use(d) a jib. Consequently my spirit sail will have a jib-like triangular shape. Based on the dimensions of the Edna, a suitable jib’s longest side would have to be some 12 m long. However my sail will not have to be functional and for practical reasons I will make it half that size which is more manageable considering work space and materials.

Lessons

My first experiment relates to the woven strips that Pacific islands sails were made of. I tear two of my rust-impregnated fabrics into strips and weave them together.

woven farbic stripsThe double layer of woven strips will make the resulting cloth strong. Once finish I realize that the cloth, being much softer than dried pandanus strips of course, does not hold together all that well when woven in strips.

sewing the woven stripsThe weaving needs to be strengthened by sewing the layers together so that the sample can keep up its shape under the stress of movement. First lesson learned.

I decide that I don’t want to paint a design on to my sail, but I don’t just want it to be plain either. I want the design to develop from the way I manipulate the various materials, be it their shape or their colour or both. Both waves and the airflow that propels a sail forward create vortices[8]. This has inspired me to use the spiral as my spirit sail’s symbol.

Machine-sewn lace techniques will give my sail certain transparency. My next sample uses some of the torn-fabric strings, with which I have bound materials to the Edna’s remains, as basic material.

pinned fabric stripsThe ironed strips are pinned to soluble stabilizer to stay in place while joining them together. The stabilizer will eventually be washed out once the sewing is finished.

The wet season has started and I learn my second lesson: Fabric that has been soaked in salt water – as have all the fabrics that touched the Edna – needs to be washed until all salt has been washed out! I was too lazy to do so and now find that the salty fabric soaks up moisture from the air. The moist fabric makes the water-soluble (!) stabilizer sticky and nearly impossible to work with!

strips lace I cannot use the free-form technique I had in mind but I get there in the end…

luminescent ribbonIn this sample I incorporate small pieces of the fairly expensive luminous ribbon just to try it out. The material is very rubbery and not exactly easy to sew through. My machine skips a few stitches here and there. I learn my third lesson: I need to reduce the speed when sewing over the ribbon.

glow in the darkI am happy with the way it glows in the dark. The ribbon certainly has potential and offers me more design possibilities.

Photoshop

There are endless possibilities for patterning the sail. The two sewing samples are only the start. I use Photoshop and play with their photos to get an idea of what can be done.

three sails

sail sketch photoshopped

[1] http://www.merriam-webster.com/dictionary/sail

[2] Guiot, H. (2007), Va’a – La pirogue polynésienne, Au Vent des Îles, French Polynesia: Tahiti

[3] http://www.thedearsurprise.com/a-brief-history-of-sailcloth-during-the-age-of-sail/

[4] http://en.wikipedia.org/wiki/Sailcloth

[5] spirit. (n.d.). Dictionary.com Unabridged. Retrieved December 04, 2014, from Dictionary.com website: http://dictionary.reference.com/browse/spirit

[6] Hegel, G.W.F. (1807, 2010), The Phenomenology of Spirit (The Phenomenology of Mind), Digireads.com Publishing, Kindle Edition, Loc. 6336

[7] http://www.wb-sails.fi/Portals/209338/news/98_11_PerfectShape/Main.htm

[8] http://www.wb-sails.fi/Portals/209338/news/99_1_AeroShape/Aero.htm

The wash-away frame

Rusty frame

In search for rusty bits and pieces that will help me dye fabrics, I wander into the bow of the Edna. She welcomes and rewards me instantly. I find this amazing frame with protruding screws on both sides that promise me regular rusty dots – my inner eye can just see them…

I drag the frame to the front where I have placed the collections of “fabrics of the day” and some lengths of builders line. There is better light here and some coral boulders that serve me as work tables and chairs. Soon the frame is safely wrapped with salt-water-soaked cotton fabric and bound tightly.

Wrapped frameThe sea has been calm. I decide to place the frame in front of Edna’s bow, high up on the beach in the sand in order to let the frame’s weight add some extra pressure to the fabric for better marking.

When I return the next day, I am shocked. According to my time calculations it should be low tide and the sea calm. Instead high waves are still breaking on the bottom of Ava Tapu beach and – my precious frame has disappeared! Disappointed I scan the beach area.

Buried fabricEventually I find a small cloth surface that protrudes through the pieces of coral and sand, buried between two heavy boulders right by the edge of the sea some ten meters or so away from where I had placed the wrapped frame. With a stick I try to dig it out but to no avail. I mark the area with my digging stick, just in case. I will have to return with a shovel. Normally I power-walk down to the beach which I will certainly not do with a shovel on my shoulder…!

Kareen, a new friend, arrives to stay with us for a week. I have seen on her blog that she is an excellent photographer. Kareen offers to help me with the digging so we take the car down to the beach.

Buried frameWhen I look for my mark it has – of course – disappeared. After some searching I glimpse a rusty fabric patch under a different boulder and the digging can begin in serious. Sand and water have sucked and pushed the wrapped frame deep under.


The two of us take turns in digging, scraping, pulling and photographing until we are finally rewarded with some movement. The frame’s sides have come unwrapped. Both have broken shorter.

Digging outThe fabric has acquired beautiful patterns of all shades from black to orange. The material seems intact with the exception of a few holes. Like sand-washed jeans, I think. If ever I want to ‘age’ fabric artificially, now I know what to do: bury it in the sand at Ava Tapu beach.

 
After some more digging we can grab at the fabric and pull, pull hard and – yay! Finally the sand releases the frame and its wrapping cloth.

Untying knotsUncovered fabric
I can’t wait to untie the knots to release the fabric. What a delight of colours!

Rusted wrapping clothIt is just the right light this late afternoon.

Washing out sandThe sand needs washing out.

Sun patterns on floating fabricThe sun paints patterns on the floating fabric.

Rust and reefIt is low tide, the sea and the sky are of a deep blue. Orange growth on the reef echoes the colours of Edna’s new cloth.

KareenRelaxing from the hard work we are happy about the result

Orange sunset All we want now is an orange sunset.

First experiments

Banner - art experiment

Exploring materiality.

Well-washed recycled cotton fabric, soaked in sea water, is my first experimental material.
Recycled cotton fabricsCasuarina and dandelionI wrap pieces around rusty areas on Edna’s bow. To include a connection between place, Ava Tapu, and material, I add some plant material growing here, such as Casuarina needles and the nicely-shaped leaves of a weed that looks similar to dandelions. These are wrapped up in the wet fabric and the ‘sausage’ wound around the rusty metal.

First rust stainsWhen I return the next day to check, nothing much has happened. Ironically, the best rust stain (left) has appeared on the banner (above) that I have attached to alert possible viewers to the purpose of these wrappings. I pour sea water over the wrapped areas and cover them with cling film to keep the moisture in while the sunshine heats the wrapping. These are left for a couple of days. Once I can see the first rust stains, I unwind the fabrics and take the bundles home with the plant material still inside.


Au sticks and fibresAtiu women use Ava Tapu beach to prepare kiriau, Lemon Hibiscus (Au – Hibiscus tiliacea) bark fibres for their dancing skirts. Long stems of young Au trees are shaved; the wooden cores with the inner bark still attached are then bundled and submerged in the sea. Heavy coral rocks serve as a weight to keep them there for a week so that the fibres can ret. Retting is a microbial process that aids in separating the bast fibers from the wooden core by breaking the chemical bonds that hold the stem together. If the sea has not stolen the bundles, the loosened bark is bleached a beautiful white. Women take the fibres home and usually leave the sticks on the beach. They have been useful for many of my projects…


Eucalyptus bark dyeAt home, pre-soaked Eucalyptus bark has given me a reddish brown dye. Together with some rust flakes collected from Edna and a dash of vinegar that I add to the dye pot, I hope it will result in a black ink.

Rust-printed cloth


I wind the rust-treated fabric-leaf bundle around a lemon hibiscus stick and simmer it in that concoction for an hour. As expected, the bundle has turned black (or charcoal rather…) due to chemical reaction of tannic acid in the Eucalyptus dye with the iron oxide.

Dyed bundleI know that opening the bundle the next day is early, as the plants have not had much chance to deposit their colour magic on to the fabrics. But with this first bundle I can’t wait. The result is promising. The casuarina needles have printed visible traces, the dandelion has left a resist print.

Now I know what I will and won’t use again.
First dye result
Dyed result - detail